Gamba Restaurant
Quick Start Your Website with Gamba Theme
- created: 10/08/2016
- latest update: 10/08/2016
- by: Alena Studio
- themeforest.net/user/alenastudio/portfolio
- email: themecocktail@gmail.com
Installing Gamba Theme
1. Install WordPress
First, you must have a wordpress installed on you website. If you don't have a working wordpress installation already, then you should install it before using Gamba Theme.
Most web hosting companies will provide you one click WordPress installation through web hosting control panels such as cPanel, Plesk or ... but if you want to install wordpress by yourself, you can follow this tutorial on WordPress Codex site or maybe doing some Google Search.
2. Install Theme
You can install your theme in two ways:
- Installing Via WordPress: First log in to wordpress admin area (/wp-admin) and then navigate to "Appearance" -> "Themes".
- Click on "Add New" tab then choose "Upload Theme" and upload your theme (.zip file which is in the downloaded package from themeforest) by clicking "Choose file" and finally click on "Install Now" button to install the theme.

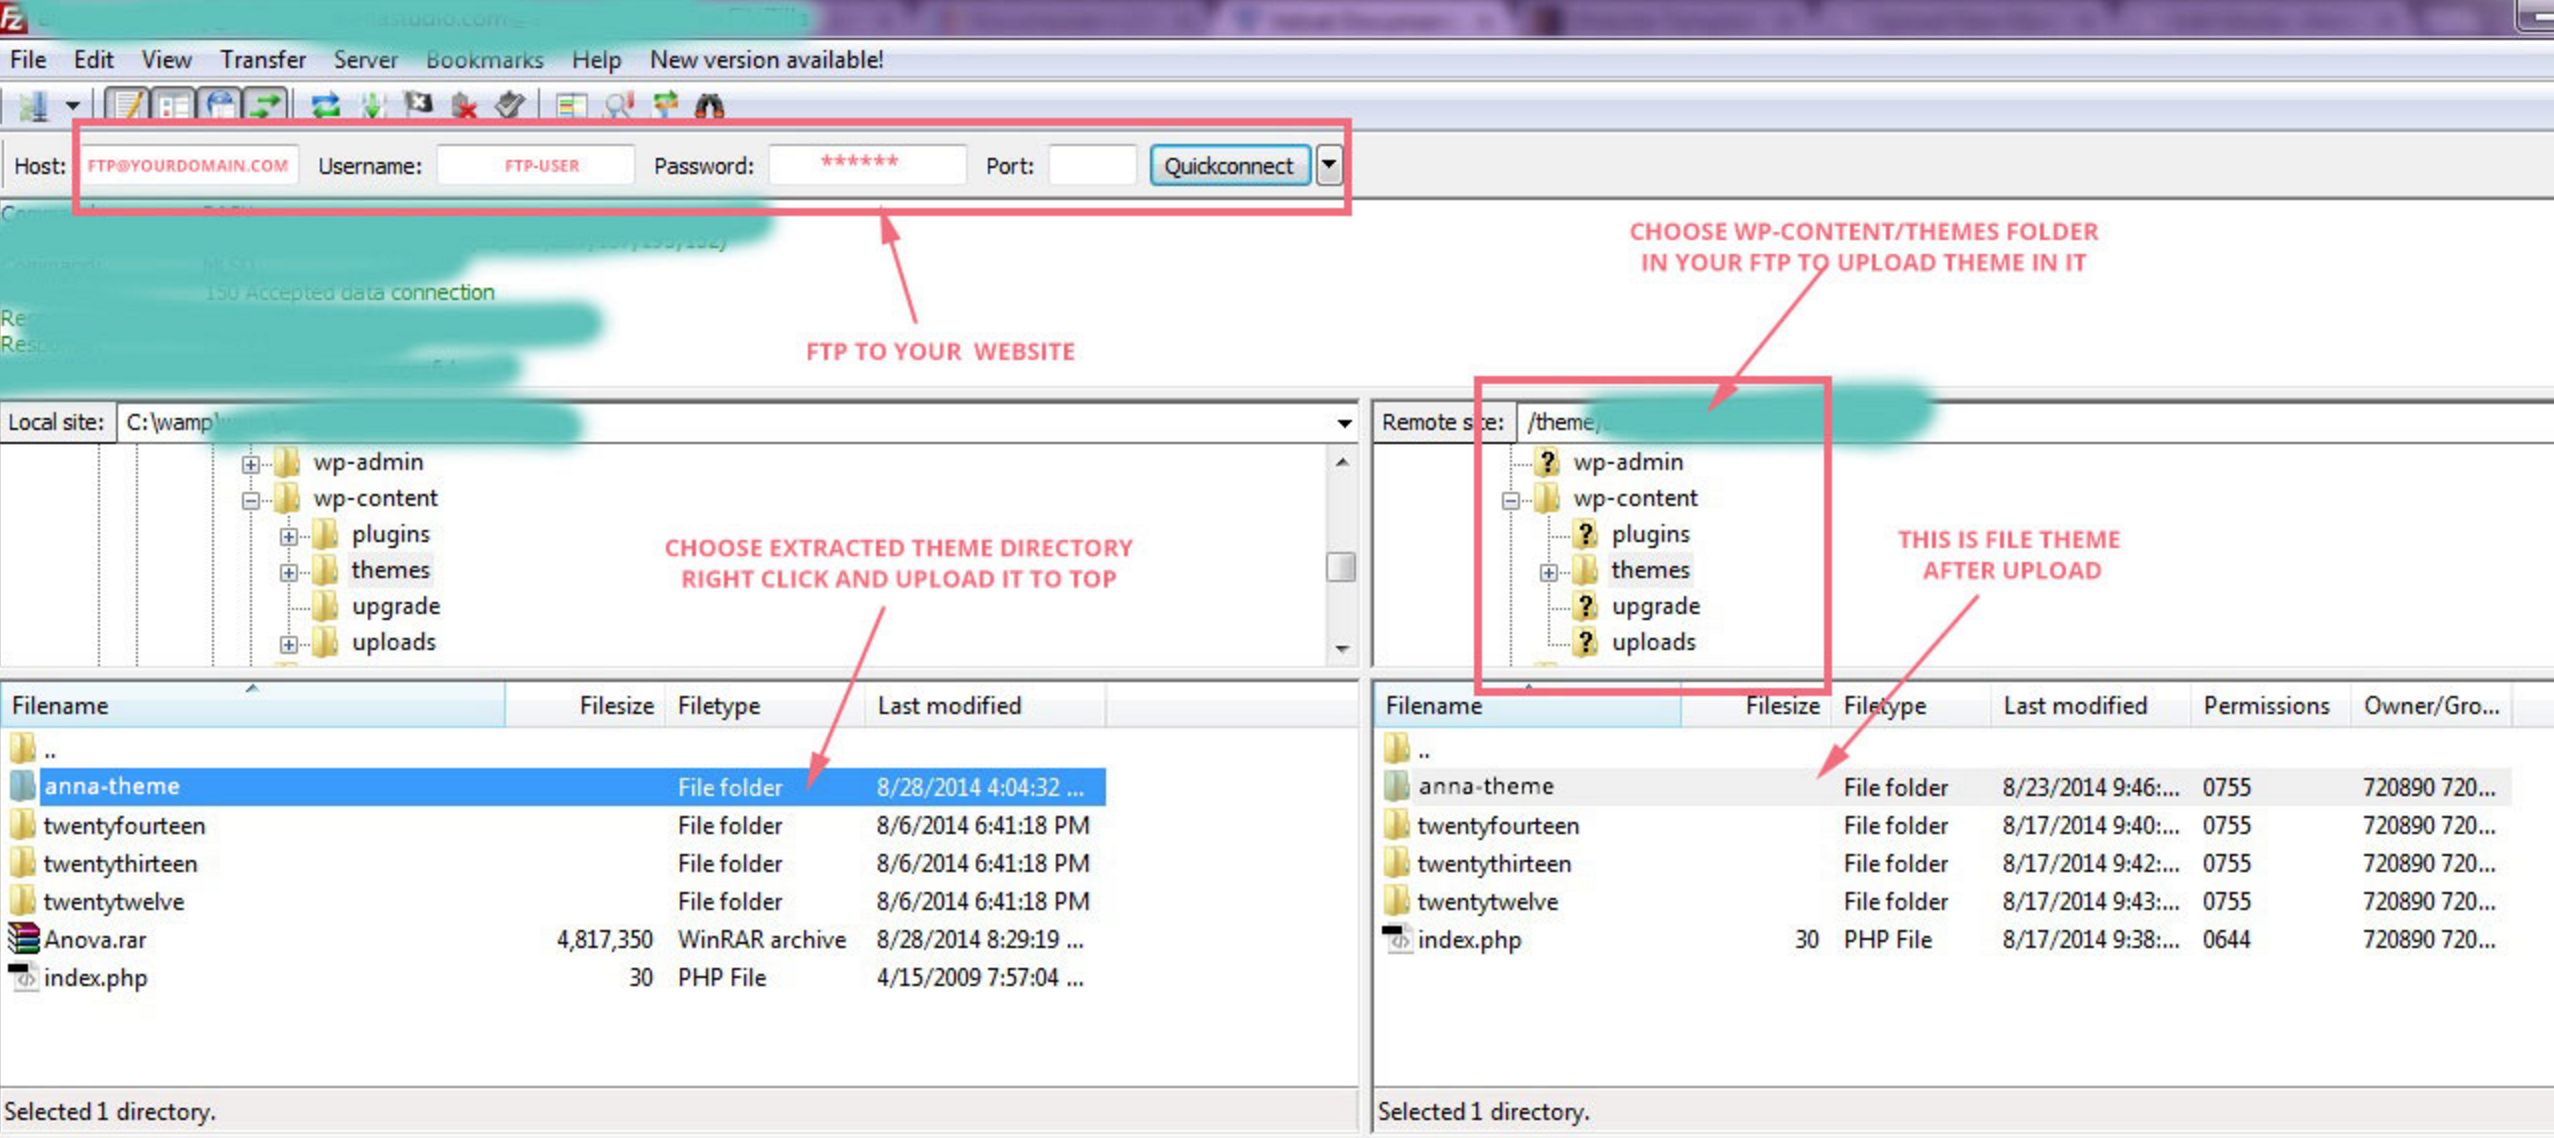
- Install Via FTP: If you want to upload your theme manually, you should first unzip your theme (.zip file which is in the downloaded package from themeforest). Then you should upload it in your website "/wp-content/themes/". After uploading you should have this directory: "/wp-content/themes/gamba-restaurant".
- After you have uploaded your theme package to your website hosting (with any of the above ways), now its time to activate the theme. Simply navigate to "Appearance" -> "Themes" and click on "Activate" link from bottom of the theme thumbnail.

Quick Start Your Site
We highly recommend you to install XML demo content which is included into your theme package. This will help you understand the theme functionalities better and have a good vision on the theme to create your own content more easily and even faster.
1. Apply Theme Options:

2. Setup Plugin for Theme:
If you had followed this tutorial from start to this point, your home page should be almost ready right now. The next step is to create an eye catching slider for your home page.
Setup Revolution Slider, Contact 7 Form, Main Mega Menu, WooCommerce...
- After active theme, click " Begin installing plugin ".
- Check all plugin in list.
- Choose Install & click Apply button.
- Back list Plugin check & choose Active for all this plugin
- Final step click Apply Button .
- Enjoy ! :)

3. Install DEMO Content:
a. One Click Install:
Yes, yes, yes ... one-click-intall content demo theme. :)
Very simple, you can see this video tutorial here :
https://youtu.be/GLgC_tatYX0?list=PLFpCY-FTHEfECVbvwTnAu8TJvjhZUrFLp
b. Install with sample-data:


General Settings
Gamba is packed with powerful theme options admin panel. To customize your website with theme options, on the admin left menu, click on "Theme Options". In Gamba theme options we've used some graphical elements and descriptions to make your works easier. So you can learn more about the options and posibilities by simply surfing in "Theme Options".
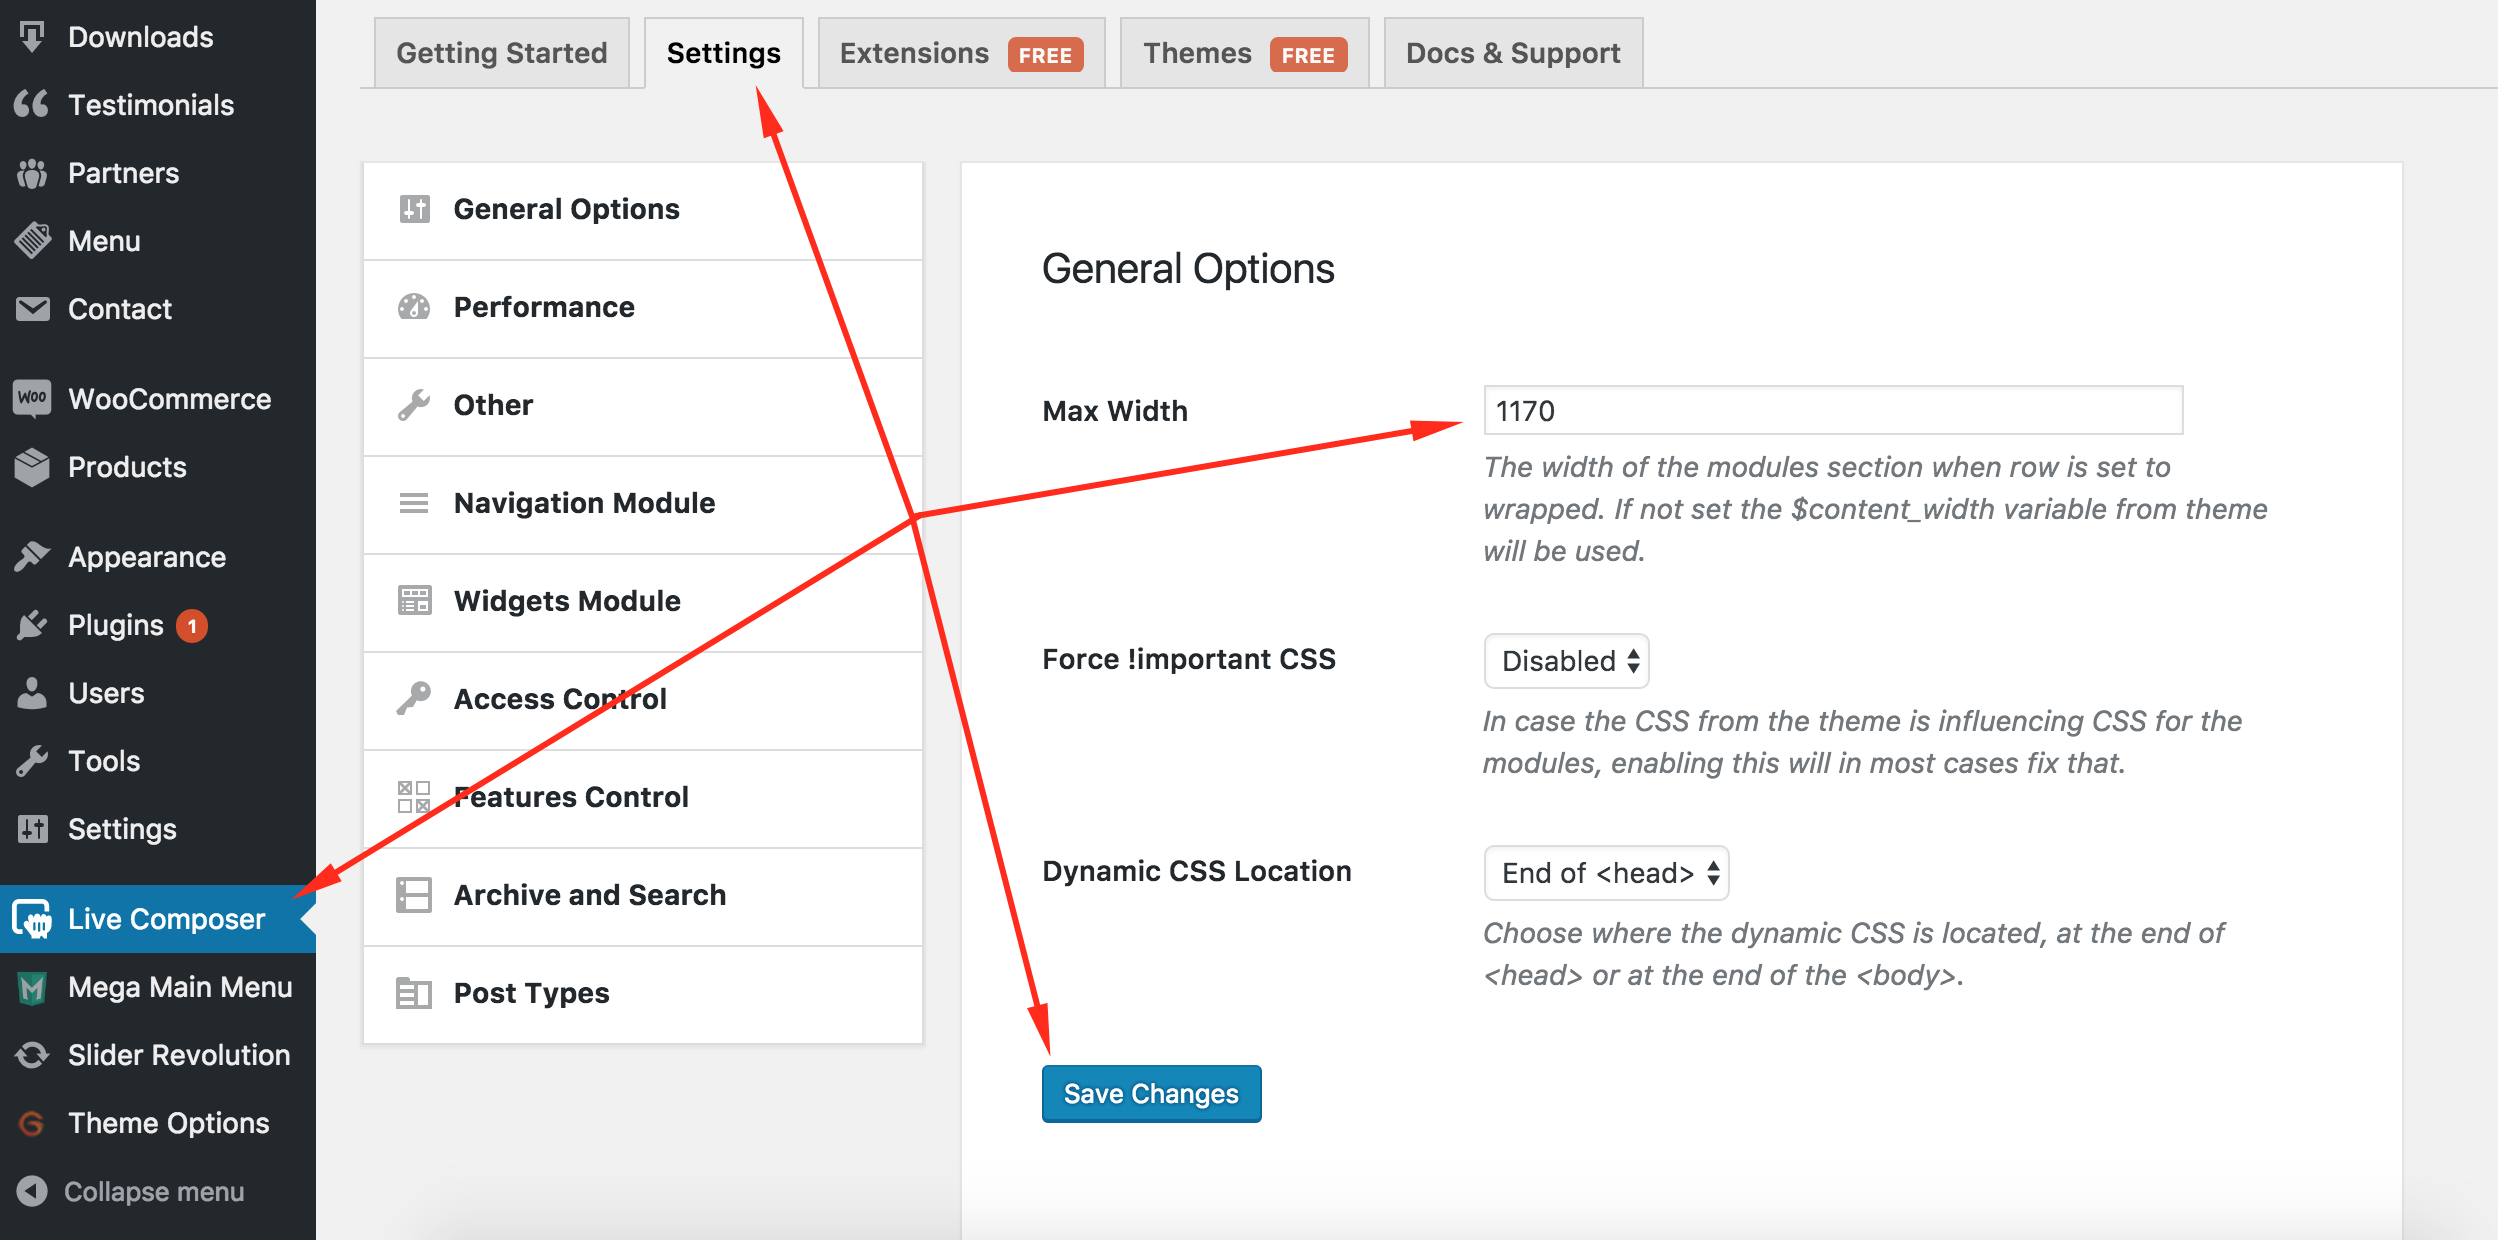
Setting Content Width of Your Site
- Go to Option from Live Composer
- Click on "General Options"
- Then fill in the "Max Width" with "1170"
- Finally, click Save Changes
Upload Your Logo
- Goto "Logo & Favicon Settings" tab
- Click on "Upload" button in the "Logo" section.
- In the media uploader window, upload your logo
- It's dimension should be about 155 x 40 pixels.
- Please upload a transparent PNG file (Best type is a PNG 24 type).
- In the upload manager, after uploading your file, choose "Full Size" in the "Size" section and click on "Use This Image".
Add Favorite Icon
Setup Home & Blog Page
To do this, simply navigate to "Pages -> Add New Page"
- Goto title and type name page.
- Click option choose Page Template, if is Home Page choose "Front Page", else if is Blog choose "Blog Template"
- Click button Publish
- Nexr step click "Settings" on Navigation Dashboard
- Click "Reading"
- Check radio button "A static Page"
- Choose Front Page is "Home" and Post Page is "Blog"
- Set number post per page in here "Blog pages show at most"
- Click Save Button
-

Setup Mega Main Menu
After installation you will see the following Mega Main Menu made to WordPress:
- Go to Dashboard Admin > Mega Main Menu > General.
- Go to Option : Backup Of The Configuration
- Click button Choose File & choose File backup of Menu ( .txt )
- Click Button Save All Changes.
- Done.
Or you can read document of Mega Main Menu here : http://manual.menu.megamain.com/

Live Composer Module
This theme is compatible with Live Composer Plugin . You can builder web layout very easy.
You can visit my chanel for tutorial using Module Live Composer Plugin : https://youtu.be/DaRhLnkJbvo?list=PLFpCY-FTHEfECVbvwTnAu8TJvjhZUrFLp
This is link demo & tutorial for of Live Composer : http://livecomposerplugin.com/
Widgets & Sidebars
Gamba is an "Unlimited Sidebars" theme. It means that you can add as much custom sidebars as you like to your wordpress. let's add a few custom sidebars:
Sidebar Settings
To add / edit or remove custom sidebars, Find "Live Composer", by navigating to "Live Composer" and choose "Widgets Module" from menu.
If you want to add a new sidebar, simply click on blue "Add New Sidebar" link. Then in the "Title" type desired sidebar title and click on "Save Changes". You've just created a new sidebar!

Contact Settings
Setup Contact Form 7 Plugin
This plugin is available in Gamba package, or you can download new version at website : http://wordpress.org/plugins/contact-form-7/
-
Upload the entire
contact-form-7. - Activate the plugin through the 'Plugins' menu in WordPress.
You will find 'Contact' menu in your WordPress admin panel.
Next step, you can configuration it with tutorial at here : http://contactform7.com/docs/ or http://cool-tricks.net/contact-form-7-configuration/#install-wp-mail-smtp-to-send-all-emails-through-an-external-smtp-server